Table of Contents
Selenium
Selenium automates browsers.
- It is one of the most well-known testing frameworks in the world that is in use.
- It is an open source project that allows testers and developers alike to develop functional tests to drive the browser.
- Selenium is a suite of tools to automate web browsers across many platforms.
- Runs in many browsers and operating systems.
- Can be controlled by many programming languages and testing frameworks
Advantages of Selenium
- Open Source
- Supports all browsers like IE, Firefox, Mozilla, Safari
- Supports all Operating Systems.
- Supports all programming languages Java,Ruby,C# and Python.
- Run multiple tests at a time.
Disadvantages of Selenium
- Identifying the locators that support common attributes like id, names etc as well as XPATH, javascript DOM and others (Use firebug for finding the locators).
- Detailed results are not available
- Selenium IDE does not supports loop and data driven testing.
Selenium Components
Selenium is composed of multiple software tools(types). Each has a specific role. They are:
- Selenium IDE
- Selenium 1 (aka. Selenium RC or Remote Control)
- Selenium 2 (aka. Selenium Webdriver)
- Selenium-Grid
- Selenium Core
Which part of Selenium is appropriate for you ?
If you want to
- create quick bug reproduction scripts
- create scripts to aid in automation-aided exploratory testing
Then use Selenium IDE, a Firefox add-on that will do simple record-and-playback of interactions with the browser.
If you want to
- create robust, browser-based regression automation
- scale and distribute scripts across many environments
Then use Selenium WebDriver, a collection of language specific bindings to drive a browser — the way it is meant to be driven.
Selenium IDE
- The Selenium-IDE (Integrated Development Environment) is the tool you use to develop your Selenium test cases.
- It’s an easy-to-use Firefox plug-in and is generally the most efficient way to develop test cases.
- This is not only a time-saver, but also an excellent way of learning Selenium script syntax.
- It has been developed using JavaScript so that it can interact with DOM (Document Object Model) using native JavaScript calls.
- Selenium IDE was developed to allow testers and developers to record their actions as they follow the workflow that they need to test.
- HTML is the default recording language of Selenium.
- Selenium IDE uses the native java script calls.
- Selenium IDE is of the most Rapid Prototyping tool.
Installing Selenium IDE
- Go to http://seleniumhq.org/download/.
- Click on the download link for Selenium IDE. You may get a message saying Firefox prevented this site (seleniumhq.org) from asking you to install software on your computer. If you do, click on the Allow button.
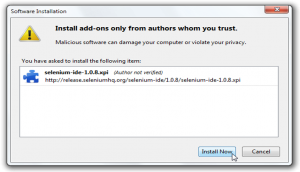
- When downloading from Firefox, you’ll be presented with the following window. Select Install Now.
- The Firefox Add-ons window pops up, first showing a progress bar, and when the download is complete, displays the following. Restart Firefox.
- After Firefox reboots you will find the Selenium-IDE listed under the Firefox Tools menu.
Opening the IDE
- To run the Selenium-IDE, simply select it from the Firefox Tools menu. It opens as follows with an empty script-editing window and a menu for loading, or creating new test cases.
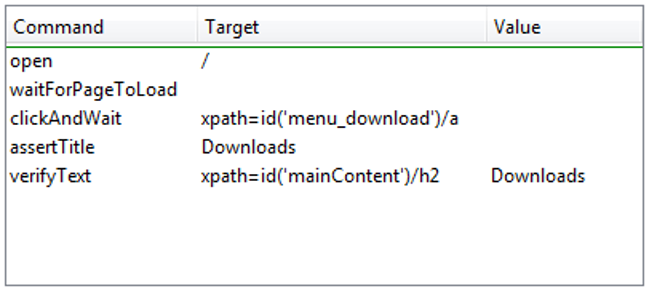
- The three major components of Selenium IDE are Command, Target and Value.
Selenium tool bar
The toolbar contains buttons for controlling the execution of your test cases, including a step feature for debugging your test cases. The right-most button, the one with the red-dot, is the record button.

Selenium IDE icons
- Base URL—This is the URL that the test will start. All open commands will be relative to the Base URL unless a full path is inserted in the open command.
- Speed Slider—This is the slider under the Fast Slow labels on the screen.
Selenium menu bar
- The File menu has options for Test Case and Test Suite (suite of Test Cases).
- Using these you can add a new Test Case, open a Test Case, save a Test Case, export Test Case in a language of your choice.
- You can also open the recent Test Case. All these options are also available for Test Suite.
- TO run the Selenium Test Suite in Selenium Ide we use Test Runner.
- The Edit menu allows copy, paste, delete, undo, and select all operations for editing the commands in your test case.
- The Options menu allows the changing of settings. You can set the timeout value for certain commands, add user-defined user extensions to the base set of Selenium commands, and specify the format (language) used when saving your test cases.
- The Help menu is the standard Firefox Help menu; only one item on this menu–UI-Element Documentation–pertains to Selenium-IDE.
Test case pane in selenium IDE
- Test script is displayed in the test case pane.
- It has two tabs, one for displaying the command and their parameters in a readable “table” format.
- The other tab – Source displays the test case in the native format in which the file will be stored.
- By default, this is HTML although it can be changed to a programming language such as Java or C#, or a scripting language like Python.
- The Source view also allows one to edit the test case in its raw form, including copy, cut and paste operations.
Log/Reference/UI-Element/Rollup Pane
- The bottom pane is used for four different functions–Log, Reference, UI-Element, and Rollup–depending on which tab is selected.
- Log : When you run your test case, error messages and information messages showing the progress are displayed in this pane automatically.
- Reference: The Reference tab is the default selection whenever you are entering or modifying Selenese commands and parameters in Table mode. In Table mode, the Reference pane will display documentation on the current command.
Selenium Commands – “Selenese”
- Selenium commands, often called selenese, are the set of commands that run your tests. A sequence of these commands is a test script.
- A command tells Selenium what to do. Selenium commands come in three “flavors”: Actions, Accessors, and Assertions.
Actions, Accessors, and Assertions in Selenium
- Actions are commands that generally manipulate the state of the application. They do things like “click this link” and “select that option”. If an Action fails, or has an error, the execution of the current test is stopped.
- Accessors examine the state of the application and store the results in variables, e.g. “storeTitle”.
- Assertions are like Accessors, but they verify that the state of the application conforms to what is expected.
Script Syntax
- Selenium commands are simple, they consist of the command and two parameters. For example:
| verifyText | //div//a[2] | Login |
- The parameters are not always required; it depends on the command. In some cases both are required, in others one parameter is required, and in still others the command may take no parameters at all..
Parameters vary, however they are typically:
- a locator for identifying a UI element within a page.
- a text pattern for verifying or asserting expected page content
- a text pattern or a selenium variable for entering text in an input field or for selecting an option from an option list.
Commonly Used Selenium Commands
- Open- opens a page using a URL.
- click/ clickAndWait– performs a click operation, and optionally waits for a new page to load.
- verifyTitle/ assertTitle– verifies an expected page title.
- verifyTextPresent–verifies expected text is somewhere on the page.
- verifyElementPresent– verifies an expected UI element, as defined by its HTML tag, is present on the page.
- verifyText– verifies expected text and its corresponding HTML tag are present on the page.
- verifyTable– verifies a table’s expected contents.
- waitForPageToLoad– pauses execution until an expected new page loads. Called automatically when clickAndWait is used.
- waitForElementPresent– pauses execution until an expected UI element, as defined by its HTML tag, is present on the page.
Difference between Assertion and Verification
- Asset and Verify are used to validate the elements that are available on the webpage.
- Verification checks many attributes of a page without aborting the test case on the first failure and will allow you to review all failures on the page and take the appropriate action.
- Whereas Assertion will abort the test case on the first failure.
- Effectively, an “assert” will fail the test and abort the current test case, whereas a “verify” will fail the test and continue to run the test case.
Context Menu in Selenium
- Selenium iDE contains a context menu that allows you to first select a UI element from the browser’s currently displayed page and then select from a list of Selenium commands with parameters pre-defined according to the context of the selected UI element.
- This is not only a time-saver, but also an excellent way of learning Selenium script syntax.
Echo- The Selenese Print Command
- Selenese has a simple command that allows you to print text to your test’s output.
- This is useful for providing informational progress notes in your test which display on the console as your test is running.
- These notes also can be used to provide context within your test result reports, which can be useful for finding where a defect exists on a page in the event your test finds a problem. Finally, echo statements can be used to print the contents of Selenium variables.
Locators in Selenium
- For many Selenium commands, a target is required.
- This target identifies an element in the content of the web application, and consists of the location strategy followed by the location in the format locatorType=location.
- The locator type can be omitted in many cases. The various locator types are:
- Locating by Identifier
- Locating by Id
- Locating by name
- Locating by XPath
- Locating Hyperlinks by Link Text
- Locating by DOM
- Locating by CSS
Firebug
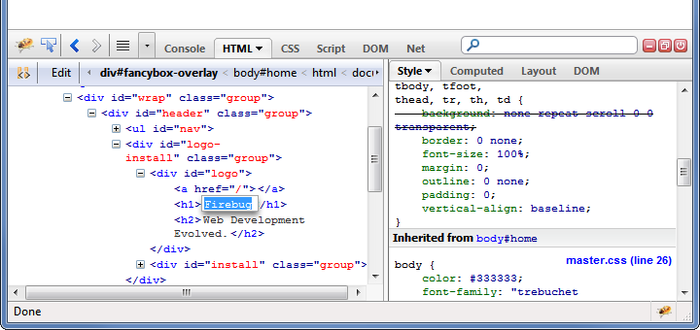
- It integrates with firefox to edit, debug, and monitor CSS, HTML, and JavaScript live in any web page.
- CSS and Xpath of an web element can be found using firebug.
- Once firebug is installed, firebug can be opened using F12 after opening the browser.
- Using inspect button, the CSS and Xpath can be found of any web element.
Locating by Identifier
- Most common method of locating elements.
- With this strategy, the first element with the id attribute value matching the location will be used. If no element has a matching id attribute, then the first element with a name attribute matching the location will be used.
- For instance, your page source could have id and name attributes as follows:
- <html><body><form id=”loginForm”><input name=”username” type=”text” />
<input name=”password” type=”password” />
<input name=”continue” type=”submit” value=”Login” />
</form>
</body>
<html> - The following locator strategies would return the elements from the HTML snippet
- identifier=loginForm
- identifier=password
- identifier=continue
- Continue
- Since the identifier type of locator is the default, the identifier= in the first three examples above is not necessary.
Locating by Id and Name
- Id locator is more limited than the identifier locator type, but also more explicit. Use this when you know an element’s id attribute.
Example ( for previous html snippet): id= loginForm
- The name locator type will locate the first element with a matching name attribute.
Example: name=username
- These three types of locators allow Selenium to test a UI element independent of its location on the page. So if the page structure and organization is altered, the test will still pass.
Locating by XPath
- XPath is the language used for locating nodes in an XML document.
- XPath can be used to either locate the element in absolute terms (not advised), or relative to an element that does have an id or name attribute.
- Absolute XPaths contain the location of all elements from the root (html) and as a result are likely to fail with only the slightest adjustment to the application.
- By finding a nearby element with an id or name attribute , you can locate your target element based on the relationship. This is much less likely to change and can make your tests more robust.
- Since only XPath locators start with “//”, it is not necessary to include the XPath= label when specifying an XPath locator.
- <html> <body><form id=”loginForm”><input name=”username” type=”text” />
<input name=”password” type=”password” />
<input name=”continue” type=”submit” value=”Login” />
<input name=”continue” type=”button” value=”Clear” />
</form>
</body>
<html> - xpath=/html/body/form[1] – Absolute path (would break if the HTML was changed only slightly)
- //form[1] – First form element in the HTML
- xpath=//form[@id=’loginForm’] – The form element with attribute named ‘id’ and the value ‘loginForm
Locating by CSS
- CSS (Cascading Style Sheets) is a language for describing the rendering of HTML and XML documents
- CSS uses Selectors for binding style properties to elements in the document.
- These Selectors can be used by Selenium as another locating strategy.
Locating Hyperlinks by Link Text
- This is a simple method of locating a hyperlink in your web page by using the text of the link. If two links with the same text are present, then the first match will be used.
<html>
<body>
<p>Are you sure you want to do this?</p>
<a href=”continue.html”>Continue</a>
<a href=”cancel.html”>Cancel</a>
</body>
<html>
- link=Continue
- link=Cancel
Locating by DOM
- The Document Object Model represents an HTML document and can be accessed using JavaScript. This location strategy takes JavaScript that evaluates to an element on the page, which can be simply the element’s location using the hierarchical dotted notation.
- Since only dom locators start with “document”, it is not necessary to include the dom= label when specifying a DOM locator.<html> <body> <form id=”loginForm”><input name=”username” type=”text” />
<input name=”password” type=”password” />
<input name=”continue” type=”submit” value=”Login” />
<input name=”continue” type=”button” value=”Clear” />
</form>
</body>
<html> - dom =document.getElementById(‘loginForm’)
- dom=document.forms [‘loginForm’]
- dom=document.forms [0]
Matching Text Patterns
- Like locators, patterns are a type of parameter frequently required by Selenese commands.
- There are three types of patterns: globbing, regular expressions, and exact
- To specify a globbing pattern parameter for a Selenese command, you can prefix the pattern with a glob: label.
- Regular expression patterns in Selenese need to be prefixed with either regexp: or regexpi:. The former is case-sensitive; the latter is case-insensitive.
Selenium Remote Control
- Selenium 1 is still actively supported
- It provides some features that may not be available in Selenium 2 for a while, including support for several languages (Java, Javascript, Ruby, PHP, Python, Perl and C#) and support for almost every browser.
RC Components
- The Selenium Server which launches and kills browsers, interprets and runs the Selenese commands passed from the test program, and acts as an HTTP proxy, intercepting and verifying HTTP messages passed between the browser and the AUT.
- Client libraries which provide the interface between each programming language and the Selenium RC Server.
Constraints in Selenium
- File Upload
- Using java-script, it is not possible to access the file upload button in the browser because java-script throws Security Violation on accessing the input element via java-script.
- Cross Domain Policy
- When the child window gets loaded with different domain than the parent window, then using java-script, it is not possible to access the child window. For ex: if the browser under test loads google.com which contains the link “Click to Load yahoo”. On clicking the link “Click to Load yahoo”, new window gets loads with yahoo.com. Now, using selenium, if the child window (window which loads the yahoo.com), cannot be accessed because of Cross Domain Policy implementation in java-script.
Simplified architecture diagram of RC

- The diagram shows the client libraries communicate with the Server passing each Selenium command for execution.
- Then the server passes the Selenium command to the browser using Selenium-Core JavaScript commands.
- The browser, using its JavaScript interpreter, executes the Selenium command.
- This runs the Selenese action or verification you specified in your test script.
Selenium Server
- Selenium Server receives Selenium commands from your test program, interprets them, and reports back to your program the results of running those tests.
- The RC server bundles Selenium Core and automatically injects it into the browser. This occurs when your test program opens the browser (using a client library API function). Selenium-Core is a JavaScript program, actually a set of JavaScript functions which interprets and executes Selenese commands using the browser’s built-in JavaScript interpreter.
- The Server receives the Selenese commands from your test program using simple HTTP GET/POST requests. This means you can use any programming language that can send HTTP requests to automate Selenium tests on the browser.
Selenium Client Libraries
- The client libraries provide the programming support that allows you to run Selenium commands from a program of your own design.
- There is a different client library for each supported language.
- A Selenium client library provides a programming interface (API), i.e., a set of functions, which run Selenium commands from your own program. Within each interface, there is a programming function that supports each Selenese command.
- The client library takes a Selenese command and passes it to the Selenium Server for processing a specific action or test against the application under test (AUT).
- The client library also receives the result of that command and passes it back to your program.
- Your program can receive the result and store it into a program variable and report it as a success or failure, or possibly take corrective action if it was an unexpected error.
- So to create a test program, you simply write a program that runs a set of Selenium commands using a client library API.
- If you already have a Selenese test script created in the Selenium-IDE, you can generate the Selenium RC code.
Installing Selenium Server
- The Selenium RC server is simply a Java jar file (selenium-server-standalone-<version-number>.jar), which doesn’t require any special installation.
- Just downloading the zip file and extracting the server in the desired directory is sufficient.
- Before starting any tests you must start the server. Go to the directory where Selenium RC’s server is located and run the following from a command-line console.
java -jar selenium-server-standalone-<version-number>.jar
Installing Java Client Driver
- Download Selenium java client driver zip
- Extract selenium-java-<version-number>.jar file
- Open your desired Java IDE – Eclipse.
- Create a java project.
- Add the selenium-java-<version-number>.jar files to your project as references.
- Add to your project classpath the file selenium-java-<version-number>.jar.
- From Selenium-IDE, export a script to a Java file and include it in your Java project, or write your Selenium test in Java using the selenium-java-client API.
Working with Java Client Driver
- You can either use JUnit, or TestNg to run your test, or you can write your own simple main() program. These concepts are explained later in this section.
- Run Selenium server from the console.
- Execute your test from the Java IDE or from the command-line.
- The parameters required when creating the browser instance are:
- host Specifies the IP address of the computer where the server is located. Usually, this is the same machine as where the client is running, so in this case localhost is passed.
- port Specifies the TCP/IP socket where the server is listening waiting for the client to establish a connection.
- browser The browser in which you want to run the tests.
- url The base url of the application under test.
- Below is the example to open a browser :
selenium = new DefaultSelenium(“localhost”, 4444, “pifirefox”, “http://www.google.com/”);
Running Commands
- Once you have the browser initialized and assigned to a variable (generally named “selenium”) you can make it run Selenese commands by calling the respective methods from the browser variable. For example, to call the type method of the selenium object:
selenium.type(“field-id”, ”string to type”)
- In the background the browser will actually perform a type operation, essentially identical to a user typing input into the browser, by using the locator and the string you specified during the method call.
Reporting Results
- Selenium RC does not have its own mechanism for reporting results. Rather, it allows you to build your reporting customized to your needs using features of your chosen programming language.
- Test frameworks like Junit and testng have library code for reporting results.
Junit framework Testing frameworks
- A software framework is a universal, reusable software platform used to develop applications, products and solutions.
- Software frameworks include support programs, compilers, code libraries, an application programming interface (API) and tool sets that bring together all the different components to enable development of a project or solution.
- The Testing framework is responsible for :
- defining the format in which to express expectations
- creating a mechanism to hook into or drive the application under test
- executing the tests
- reporting results
- There are two types of testing frameworks :
- Junit
- Testng
JUnit framework
- JUnit in version 4.x is a test framework which uses annotations to identify methods that are test methods.
- Typically these test methods are contained in a class which is only used for testing.
- To write a test with JUnit you annotate a method with the @org.junit.Test annotation and use a method provided by JUnit to check the expected result of the code execution versus the actual result.
- Eclipse user interface or the org.junit.runner.JUnitCore class is used to run the test.
Junit annotations
| @Test public void method() | The annotation @Test identifies that a method is a test method. |
| @Before public void method() | Executes the method before each test. This method can prepare the test environment (e.g. read input data, initialize the class). |
| @After public void method() | Executes the method after each test. This method can cleanup the test environment (e.g. delete temporary data, restore defaults). |
| @BeforeClass public void method() | Executes the method once, before the start of all tests. This can be used to perform time intensive activities, for example to connect to a database. Methods annotated with this annotation need a static modifier to work with JUnit. |
| @AfterClass public void method() | Executes the method once, after all tests have been finished. This can be used to perform clean-up activities, for example to disconnect from a database. Methods annotated with @AfterClass need a static modifier to work with JUnit. |
| @Ignore | Ignores the test method. This is useful when the underlying code has been changed and the test case has not yet been adapted. Or if the execution time of this test is too long to be included. |
| @Test (expected = Exception.class) | Fails, if the method does not throw the named exception. |
| @Test(timeout=100) | Fails, if the method takes longer than 100 milliseconds. |
Test Results in Java
- If Selenium Test cases are developed using JUnit then JUnit Report can be used to generate test reports.
- If Selenium Test cases are developed using TestNG then no external task is required to generate test reports. The TestNG framework generates an HTML report which list details of tests.
- ReportNG is a HTML reporting plug-in for the TestNG framework. It is intended as a replacement for the default TestNG HTML report. ReportNG provides a simple, colour-coded view of the test results.
- Also, for a very nice summary report try using TestNG-xslt.